Mt. Whitney Trip Report Part II

Day 2 (9/12/12)-Mt. Whitney Summit
Who: Brad, Jeremy, and I
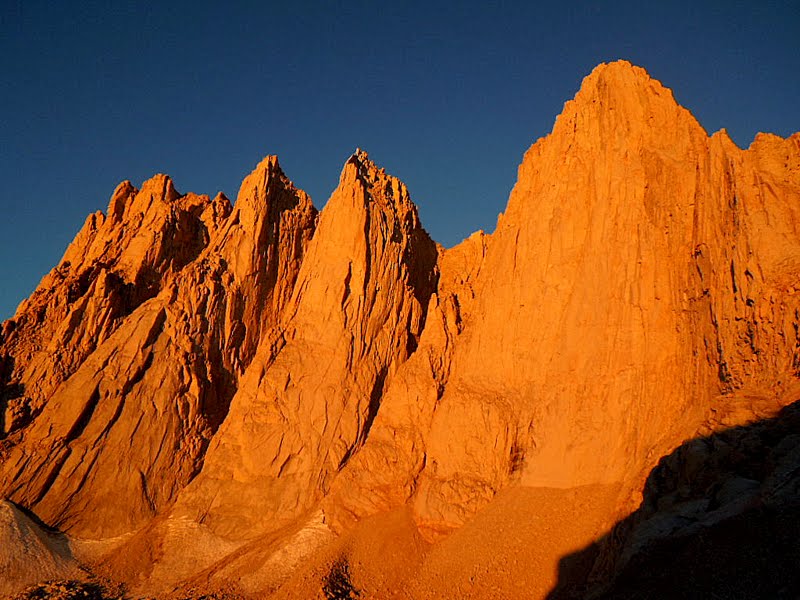
The goal was to climb the remaining route of Mt. Whitney's MR route from Upper Boy Scout Lake (UBSL). The day's forecast called for bluebird day, light winds, and thin air!!!! The picture above was taken from Iceberg Lake looking up at Mt. Whitney. Picture doesn't really capture how enormous the face is...let's put it this way: Iceberg Lake's elevation is around 12,600'...the Summit is 14,505'. So from where this picture is taken...the summit is nearly 2000' above!!! The Needles to the left of Whitney are as equally impressive. Each of those faces have routes on them too!!!

Our alarms went off at 4:00 a.m... But to be honest, I was already up...I went to bed the night before at 7:45 p.m. and had enough sleep. Not to mention, I was super stoked to get up the mountain. The temps dropped to 37 this morning, and that was OK with me...all we had seen online is that it was supposed to be below freezing all week at our elevation. So I was glad that it was warmer. We turned on headlamps, cooked breakfast, drank hot coffee, got dressed, and got going at 5:30 a.m. We were going up the mountain before the sun came up...after 30 minutes or so, we got to see our first rays of the day!!!

(sorry for quality of picture above...but it was dark) As the first rays of the sun came up, our first views of Whitney and neighboring needles came into view. It was an "awe" moment. We had only seen Whitney and the needles from down in the Alabama Hills and Lone Pine, and maybe for a short moment on the drive into Whitney Portal. But the peaks remained hidden under cloud cover for most of the previous afternoon. Of course, it was still dark as we approached the base, so when we could make them out...it was just one of the moments I will never forget.

We continued on trail towards Iceberg Lake...this is what you want to know about the section from UBSL to Iceberg. It is approximately .9 miles and 1000' of elevation gain to the "black streaks" you see above. The trail from camp can be faint at times, but there are cairns that guide you all the way up to Iceberg Lake. The trail is rocky and I would consider it a class 2 hike. You can see a group of climbers in the middle of the picture...this is what the trail/terrain looks like on this section. The two landmarks you want to look for are the moraine field on your left and the black streaks on your right as your making your way up. When the black streaks end, there will be a faint rocky trail with cairns that start heading up towards the ridge on your right...

This is what it looks like going up to the ridge towards Iceberg Lake. It took us 1:15 minutes to get over the ridge and get our first views of the lake. We spent 10 minutes at the lake filtering water, knowing it may be a while before we return. There are no more water sources above Iceberg Lake....so this may be a good spot to fill up.
Right at this point in our trek, the sun was right below the horizon to the East of us. And in doing so, lit up the walls!!!! There is just something about alpenglow that is inspiring and motivating...though we had been hiking for more than an hour, this sight somehow marks the official start of the day for me.

After we filtered water, we strapped on our helmets and made our way up the mountain. The MR route has a few variations up the gully. They all lead to the same point...that is the notch that you see above my head. You could either take the left side of the gully or take the right. In the picture above...the left gully begins where the rock rib (the wall is shaded below it...or towards the left side of the picture) begins and right gully is right above me.

Here's another view..I'm leading and Brad following behind. We chose to ascend the left side of the gully. We've read that the left side is the preferred side since the rock is more solid than the right. And it is...initially...but as you continue up the rock, the quality lessens and it's as chossy, loose, and unstable (i.e. shitty!!!!) as the right side. Also, the picture is misleading...as is when you are standing below looking up. The notch is still 1500' above you from the lake...so it's a long scramble up.

Once you are in the gully, the rest of the way up is Class 2+ or with a few Class 3 moves along the way. Once we entered the left gully, we chose to climb up above it on the left side. It's big boulders and you avoid loose rock...but this only lasts so long. The choss is inevitable...

This is the same point from picture above, but looking down towards Iceberg Lake...As you can see, the rock quality is better. The gully is actually to the left of Brad above...down below. We stayed on these rocks as long as we could.

Here's Jeremy giving a goofy grin...If you look past the guys, you can get a feel of what the slope of the couloir is like...from Iceberg Lake, the slope slowly increases to about 30 degrees or so. As you ascend up, it steepens to about 40-45 degrees. When you are half way up the couloir, the remaining route to the notch is at least 45-50 degrees. With all the loose rock and the steepness of the slope...it's highly recommended that you do this climb with a helmet. Especially if you have climber's above you...rocks will slide down the mountain.

This is Iceberg lake...give you a little bit of perspective...there are tents and people to the right of the lake. But you can't see them from here. The lake is big...a lot bigger than UBSL.


The three pictures above are good examples of what the left (and really the right) gullies of the couloir look like on the way up to the notch. As mentioned above, its loose and rotten. I felt like every step I took, I slid back an inch or so. In the picture above, I am resting right before the two gullies intersect...the two gullies become one, the couloir narrows, and you are nearing the notch.

This is Brad and Jeremy taking a break right under me from the same point as above. You can see the couloir makes a large "V" with the walls down below...once again, you can see how rotten the rock is to the right of Jeremy.

A little over 14,000', you finally arrive at the "notch". Here you get incredible views of Mt. Russell to the North, another California 14er! We had hopes for doing both Whitney and Russell in the same day...and at this point, we thought it was a possibility. But our eyes and heart were bigger than our lungs and legs. When we finally got back down to Iceberg and rested...we looked at what it took to climb Russell and bowed out. But anyways, back to the route at hand...

After going through the "notch", you get your first views of the North Face of the mountain and "final 400'" of the remaining route of Whitney. There are several, several ways to go up this side of the mountain. However, I will recommend that you never take the "walk off" route to Whitney. We did this on our way back (why you see us in picture above coming from the "walk off") and it felt like the entire mountainside was ready to slide down thousands of feet down. Every step felt like cheating death. Though technically it's graded class 2 and it's the "easiest" way up...it's NOT!!! You never feel comfortable. We met some Germans in Zion National Park that were going up the same time we were descending Whitney and they described it best, "itz death ledge"...Just go up the final 400 and come down the final 400. The rock is bombproof...super solid. Anyways, if you look above, the final 400' starts at the lower left corner of the picture.

When you get to the base of the final 400', you look up and it looks like this. The rock is great!!! This is the best rock on the entire MR route...this includes everything from Whitney Portal TH. The two main things to look out for are ice (where you see black streaks) and exposure. A fall here would be bad news...Though the picture above really doesn't give you perspective on exposure...it's there.

This is a picture of the final 400' looking down...this is a better picture of the exposure...but not really. It's hard to explain the exposure on this part...there are good ledges that make it feel "safe" but then there are a few moves that leave you completely exposed to a fall that will result in "imminent death." Of course, it all depends on which route you take up...there are dozens of way to scramble this face. This is why we chose to come down the "death ledge"...we took a few looks down and really didn't want to downclimb. If you are going this route...forget about what it looks like and how you feel. Just downclimb the solid rock and avoid the eventual rockslide to death.

This is the first move onto the final 400'...it's a few class 3/4 moves up 15' or so, nothing too technical...but it does require a few climbing moves. As you can see above...once you get past this part, you step onto a slabby shelf. If you are a climber, this move is not hard at all. If you are not a climber...the move just requires attention, composure, and grit. You wont fall to death on this first move...but you could get hurt if you fall.

After the initial move on to the final 400', you scramble up a series of shelves. We stayed towards the left as much as possible, since the route to the right was covered in ice and too slippery to climb. The lower part of this last section is not as steep, but as you climb up, it steepens quite a bit and it felt like the slope reached a sustained 60 degrees or so. This part of the climb is definitely steeper than the couloir up...but it's only 400' of climbing verses thousands. Very doable...just keep composed.


As mentioned before...there are so many lines up this route. Depending on how comfortable you feel, you can make this as easy or as hard as you like. Brad was ahead of us...and it looked like he was continuing up the left side of the chute and was climbing on class 4 rock. Jeremy and I traversed over to the right side and kept it at class 3. As you can see above, though you keep it at class 3, there is still significant exposure and will be a few places where you just have to climb up and over rocks.

After 3.5 hours from leaving basecamp...we saw the "hut" on top and finally summited the highest point in the contiguous United States!!! We had finally arrived...it was all things...amazing, incredible, powerful, wonderful, humbling, and rewarding. I had been dreaming about this moment for a long time. As I stepped up to the actual summit...I was more thankful than anything else...just thankful for this moment, thankful for safety to this point, and thankful to be covered in grace as I made my way... I then kneeled and met my Savior for thanks!

(One of my favorite pics of the week: Jeremy on summit.)

(Picture of group: Jeremy, me, and Brad...with Summit hut behind us)
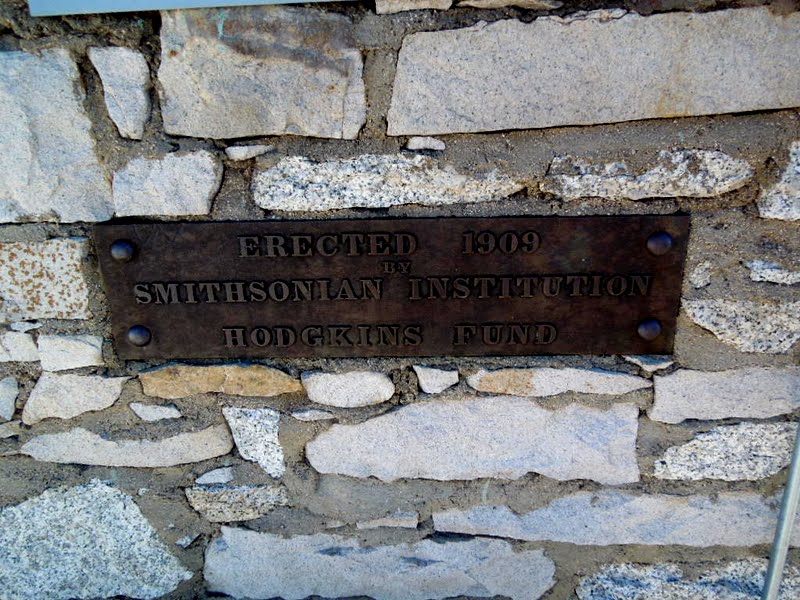
The Smithsonian Institution Hut...or Mt. Whitney Hut was built in 1909 to protect scientists from weather...i.e lightning...while studying high altitude stuff...but today, hikers are warned not to use it for shelter. It's not safe...At the shelter, there is a summit register where you can make your mark:

All three of us signed the register...we were the 4th, 5th, and 6th people on the summit that morning. But the first to ascend it via the MR route!!!! Up top, we shared the summit with two guys...interestingly enough, from Texas as well.


On the summit, there are a few summit benchmarks and a sign...all indicating different elevations of Mt. Whitney. To keep it simple...the summit elevation has changed over the years because of different variables that include technological improvements in surveying and the fact that the High Sierras are still growing due the Pacific and North American Plates colliding. But I am no scientist, so I will not go into those details...I was told that the accepted height of Mt Whitney today is now 14,505'. That'll work for me!

After spending an hour on the summit...enjoying everything around...we scrambled and slid our way down to Iceberg Lake. We spent another hour at Iceberg Lake resting, napping, and eating lunch...after 8 hours of going up and down the mountain, we were back down to UBSL...and as you see above, this is what we did for the rest of the afternoon. We just laid out on warm granite, enjoyed the cool breeze, and recovered from a long day of climbing Mt. Whitney. We also flirted with the idea of jumping in the lake you see behind...but it was too cold for us. I got in too about my knees and washed up...but couldn't muster up the courage to dive in. We spent the early evening playing a rock toss game Brad and I invented...

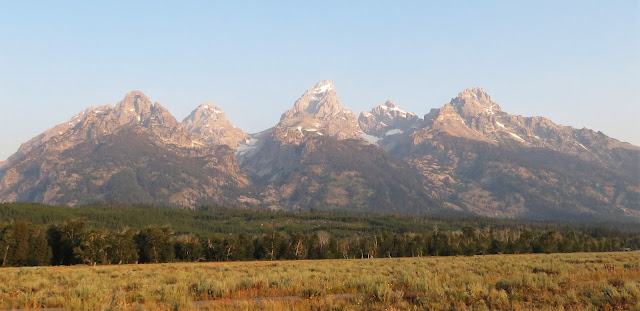
The next morning, we woke up to the sunrise over the mountains...ate breakfast, and were excited about getting down to Whitney Portal...where you can buy a hot shower for $3. We also knew we were about to go on one of the best drives in America...the highway that drives through Death Valley National Park to Las Vegas to Zion National Park!
Comments
Post a Comment